Similar to categories, tags are a way of grouping WordPress posts and pages. They are usually more specific than categories but are entirely optional. Although you can easily decide not to use tags in your posts, most people in WordPress do tag their posts with at least one word which is the most relevant to the article they have been writing.
The problem with tags is that most new bloggers who started their blogs, don’t use them correctly. Some will fill in the tag text box just to feel their post is getting better, while the other ones will keep on adding irrelevant tags and overpopulate the textbox. Like with most things in life, you should be moderate. We suggest that you add 2-3 tags per post and also keep the minimum number of unique ones. Since WordPress creates an additional page for each tag, you don’t want to overfill your database with unnecessary information.
If you’re serious about tagging your posts, you already know that you can lose even several precious minutes per each post by choosing the right tags. But what if we told you that you could automatically add tags to your WordPress posts?
Smart Tag Insert
PRICE: Free
As you can already see, automatically adding tags can be done with the help of a free plugin. You won’t have to modify files or write code since Smart Tag Insert will do the job for you. Instead of losing time thinking about tags for each post you write, the plugin will let you set things up through a friendly user interface. The plugin will find several tags that are the best for your posts, and you get to use them or modify them if you need to.
Create a list of tags
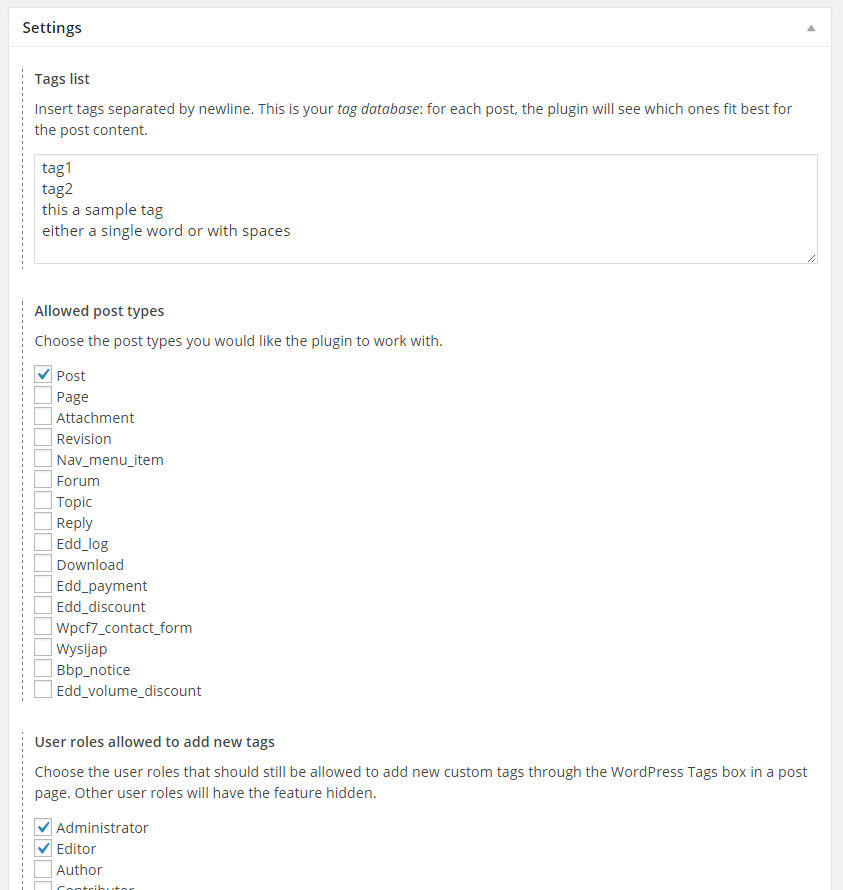
After you install and activate the plugin, the first thing you will want to do is to create a list of tags. Smart Tag Insert will use this list in the future; the plugin will scan all the tags you have listed so that it can find the most appropriate ones for your articles.
You can use words or the entire phrases. To write a longer tag, simply add a space between words.
Allowed Post Types
Instead of automatically adding tags to each and every post type you have, the plugin lets you choose the post type(s) it will work with. This means that you can select only posts, pages or revisions, for example. The good news is that the plugin will recognize all of your custom post types so that you can choose to work with them, as well.

User roles allowed to add new custom tags
This option will allow you to choose user roles which will be able to add custom tags from the Tags widget. For example, if you check the box next to Authors, only they will be able to come up with new tag ideas when writing articles. All the other users won’t be able to see the Tags widget.
Automatically add tags to older posts
Everything mentioned above will work for your future posts. In most cases, you will already have some published posts before installation of this plugin. But that doesn’t have to worry you because Smart Tag Insert got you covered with the latest option, so you can dedicate more time to promoting your content and earning money with your site.
With a single click of a button, you can automatically add the most relevant tags to all of your older posts. The first button will add the defined number of tags to selected post types, while the other button will remove all the old tags and replace them with the new ones. Before hitting the button, you should know that this option is irreversible so make sure that you know what you’re doing and create a backup before applying changes.
Although it will take you some time to set up the plugin, you will save yourself some time in the future. The plugin will take care of your tags and you will be able to relax and think about creating the content. Have you tried Smart Tag Insert plugin? How do you like it?
When you’re working alone, you probably don’t have to use functions and plugins to restrict yourself from posting to much or writing tags in your posts overmuch. That’s probably the case if you have a personal blog or a simple website which you can keep maintained by yourself.
But if you have more than just a few authors writing on your WordPress website, the chances are not all of them will always take care of the rules you have created.
Although sometimes more tags are better options than having just one or none, too many tags will not be a good thing for your site either. Placing too many tags in a post will sooner or later lose its purpose. So if you have to limit your authors to few tags, you can do that easily. Of course, there is a plugin for that and this one is free and easy to install and set up.
WP Limit tag
Since the plugin is free, you only have to install and activate it before you go to the settings area. Once you do that, you can easily set the maximum number of tags a user can use in a post. After you save changes, when an author gets to the set up the limit, “Add New” button will simply disappear and make adding new tags impossible. That way, your authors will have to choose only the most suitable tags for a post.
Not only that, but you have the power to choose which post types are restricted by this plugin and which aren’t, while the plugin will work for all taxonomies which aren’t hierarchical.
Limit the number of tags in the WordPress Tag Cloud widget
As a feature of the early Web 2.0, tag cloud has become a very popular part of newly created websites. The tag cloud is a visual representation of keyword metadata, aka tags, where the most frequent words are usually displayed in a bigger font or in a different color which would accentuate that word. The cloud looks like a little map that can instantly tell a visitor what are the most common topics around your site and navigate them directly to articles of interest.
Although a tag cloud can look great and can help a lot, if you’re using too many different tags, your cloud will look very crowded. Not only that will look messy, but some important tags might get lost in the crowd because of that.
So, you’re probably wondering how to limit the maximum tag number in WordPress. Since there is no simple option in the WordPress dashboard or settings area for limiting tags in the Tag Cloud, you will have to make one for yourself. Yes, you will have to copy and paste few lines of code, but the job is done in a few seconds.
- Open function.php file of a theme you’re using
- Copy and paste the following code:
add_filter('widget_tag_cloud_args',
'limit_tag_in_tag_cloud_widget');
function limit_tag_in_tag_cloud_widget($args){
if(isset($args['taxonomy'])
&& $args['taxonomy'] == 'post_tag'){
$args['number'] = 10; //Limit number of tags
}
return $args;
}
- Inline #5, change the number to any number of tags you want in a cloud.
- Save changes
That’s all. You can now add a Tag Cloud widget which should display no more than the number of tags you have specified in the code. Enjoy!
Conclusion
Sometimes, tags might feel like an archaic piece of technology. If you feel that way, well you’re just wrong. Tags are still an important element of many blogs and websites, but the problem is that most of the people just don’t use them correctly.
When working with tags, make sure to keep things neat and organized. If you need help with restricting the number of tags, or you want to automatically set tags for your posts, this guide will help you. Now, let us know – do you use tags on your site? Do you have any specific rules about them?


