Before we actually show you how to create your own custom post type which you’ll be proudly using on your new WordPress powered blog, let’s see what a custom post type actually is.
A post type is simply a set of rules which are used to describe the way content is presented in your article. Each post type has its own parameters which define it so you can tell a difference between a post, page, archive, revision or a navigation menu. But as you will see, if you start writing articles as your posts, everything you write will have the same structure. That’s because you will use the same template for the post. But that is completely OK if you write a blog where one post type is enough to handle your articles.
Through the not so long history, WordPress has evolved tremendously and it has definitely outgrown its role as a blog platform. It has become one of the most used and appreciated content management systems in the world. Allowing people to create custom post types is one of the main reasons for that.
Let’s see what a custom post type can do for you in a simple example. Imagine you are running a gaming website. You want to publish news on a regular basis, there are numerous trailers published every day which you can share with your audience, your authors play new games and write reviews, you want to publish screenshots from your latest online match, etc.
As you can already guess, there are several content types you would need in this case and if you continue on using regular posts, all of the content will look the same and it will make it harder for you and for your visitors to find a difference between a video article and a review. Yes, you want a custom post type to make everything look more organized.
Stay with that picture just for a few more seconds. If you create a custom post type, your news could have a special area where you can place a link to the source. Your game review post type could have a rating the author gave to a certain game including a star-based system, and you can apply different styling for, let’s say, the subtitle of your review. Your trailers post type would accentuate a video and let people enjoy it from a lightbox instead of viewing it in a post. We can go on forever, but you get the point, right?
Create a Custom Post Type
OK, we know you are getting bored with our talk – you are here to learn how to create a custom post so let’s start. Stretch your muscles, take a deep breath and when you are ready, let’s start. If you’re interested in digging deeper into WordPress and the code, skip to the plugin that will help you.
- Open functions.php file and paste the following code.
Make sure the code is placed before the closing PHP tag (?>) or it won’t work.
// Creates Game Reviews Custom Post Type
function game_reviews_init() {
$args = array(
'label' => 'Game Reviews',
'public' => true,
'show_ui' => true,
'capability_type' => 'post',
'hierarchical' => false,
'rewrite' => array('slug' => 'game-reviews'),
'query_var' => true,
'menu_icon' => 'dashicons-video-alt',
'supports' => array(
'title',
'editor',
'excerpt',
'trackbacks',
'custom-fields',
'comments',
'revisions',
'thumbnail',
'author',
'page-attributes',)
);
register_post_type( 'game-reviews', $args );
}
add_action( 'init', 'game_reviews_init' );
- Save changes
If you take a look at your admin area in WordPress, you will notice there is a new item “Game Reviews” available on the menu. So far, it will look like any other post but you will still not be able to see these posts online. You have a few more steps to follow through in order to make the most out of this custom post type.
Be sure to set up your permalinks before you try your new post or you’ll end up with an error.
Create a template for your new custom post type:
- Open your theme’s folder
- Create a new file and name it something like game-review-template.php
- Open the file and paste the following:
<?php
/**
* Template Name: Game Reviews
**/
?>
- Open page.php file which is located in your theme’s folder
- Copy and paste the code into you game-review-template.php
- Find a piece of code which is the same, or similar to this (might depend on your theme):
<?php endif; ?>
<?php endwhile; ?>
When you have located this part, let’s modify it so you can show your custom post type on a new page. You should add the $query line above your loop and then modify the loop itself. When you modify the code, it should look like this:
<?php
 $query = new WP_Query( array('post_type'
=> 'game-reviews','posts_per_page' => 5 ) );
 while ( $query->have_posts() ) : $query->the_post();
?>
// Your code e.g. "the_content();"
- Save changes
- Go to Pages -> Add new
- Create a page with the name “Game Reviews”
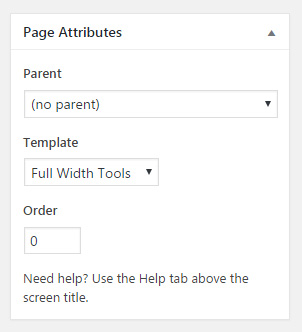
- On the right side, under the “Page Attributes” tab you should find “Template”

Choose a template you have created in one of the previous steps and assign it to the page.
- Save changes
- That’s it. You should try everything and create a new Game Review post. Once you open your Game Review page, you should be able to see your news post types lined up chronologically just like your normal post would be.
And this is just the beginning. You have created the custom post type, but now you should modify it the way you like it and add the code which you need.
Create custom post types with plugins
When you start creating your own post types to expand your WordPress, there are two ways to go. We already showed you one – how to manually create a custom post type. By following several steps, you can create a custom post type but it might take much of your time if you are a WordPress beginner and not used to dealing with the code. But you don’t have to mess around with the code – if you need a simpler and quicker solution, you can create numberless custom post types by using one of the plugins.
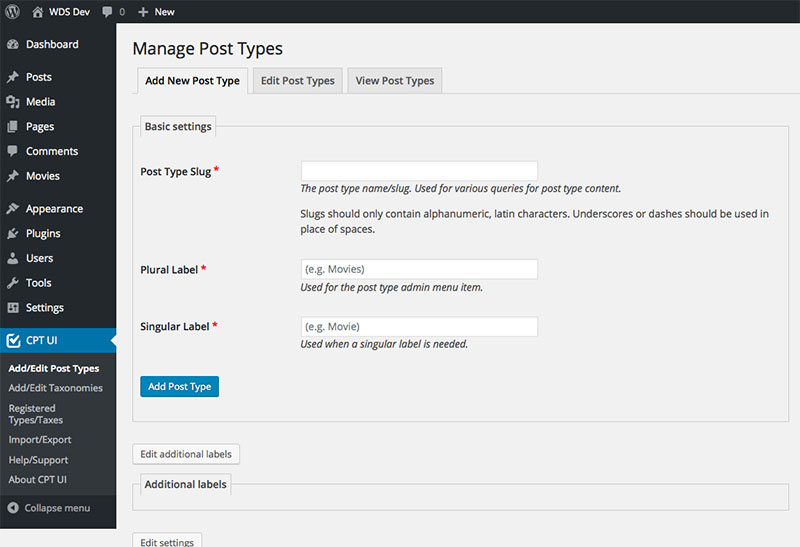
In this part of the tutorial, we’re about to show you one of the best plugins which will create those custom post types for you. You won’t have to code or even copy/paste the code. Simply install the plugin, write in the name of your new post type and set it up through GUI.
Custom Post Type UI
PRICE: Free

If you only need to register a custom post type, this plugin will do a good job. After you install it, you’ll be able to create custom post types and taxonomies. Simply go to a newly created menu, add a new custom post type, and write the name and description of your new post type. It is easy as that but you will have to notice that this plugin won’t handle displaying your new post type. Once you register the new post type, it is still up to you how to display it. We suggest that you check out how to do that or go with some other plugin which can also display your posts.
Conclusion
Custom Post Types are one of the greatest WordPress features even today. By simply modifying a few lines of code, or using a plugin, you can generate a post type that will be unique to your site. The truth is that it might be a little bit harder for a beginner to complete everything for the first time, but if you stick with this tutorial, you should not have any problems.


