Whether it is a blog, a simple personal website, or a business portfolio that you are building with WordPress, you are doing it for a reason. You want people to be able to get to the content that you have presented online. Without the audience, your web project doesn’t serve its purpose. So one way or another, you need to start understanding people that visit your domain.
Who are the individuals that opened your site? How many of them visit your site in a month? Do they come back and how long do they keep your site opened? Did they originate from a search engine, social networking site or maybe they manually entered the address? These are just a few important questions that every website owner should ask themselves on a regular basis.
Asking the questions is the easy part; but how do you answer them?
What is Google Analytics?
You can answer the above questions with a free Google service. Google Analytics is a very powerful (this is still an understatement) online web analytics tool that can track the behavior of a website and all visitors that are part of it. Although not the only of a kind, Google Analytics is definitely one of the most popular analytics tools for the job. People use it worldwide to get stats about sites ranging from simple blogs to corporate portals that generate millions of monthly users.
The service was introduced in 2005. It offers numberless reporting tools; from showing real-time visitors, locations, and technology to eCommerce data that can track the number of sales. https://youtu.be/WC3ONXJn9FQ
How does it work?
Google Analytics requires everyone to open a free account that gets a unique tracking ID code. After putting the code on a site, Google Analytics runs every time that a visitor loads any of the associated pages.
This tracking code then runs in the clients’ browsers and tracks the behavior. Although this wasn’t possible a few years ago, the data is usually sent in real time to the service which quickly interprets all the signals. It allows you to immediately see how many users are loading your site and all the details about their visit.
How to add Google Analytics to your site
Before you get to place the tracking code to your site, you will need to create a Google Analytics account:
- Navigate to Google Analytics
- Sign in with your Gmail account
- Click the “Sign up” button
- Choose the “website” option
- Enter the information like the name of your account, website name, URL, country, and the time zone
- Agree to the terms and conditions
After completing the steps, the account should be ready, and you can now start connecting it to your website. Just like with anything in WordPress, you can get the job done in several different ways. In this article, we are going to show you two different techniques of adding Google Analytics to your WordPress site.
1. Use WordPress plugins to add Google Analytics
If you want just a basic tracking info through Google Analytics, the manual methods are just fine. But if you want to be able to track the statistics on daily basis, the plugin might be a better choice. There are several amazing WordPress plugins that are dedicated to Google’s tracking service. They will help you connect the site to it without wrangling the code, and they will also provide some extra features that you will probably love.
By using a plugin, you can have Google Analytics in your WordPress dashboard. So, instead of always opening the official service pages, you can see the most relevant statistics directly from your WordPress admin page.
Google Analytics Dashboard for WP (GADWP)
PRICE: Free
With more than one million active users, this is the most popular WordPress plugin that can connect your site to the popular Google’s tracking tool. The numbers don’t surprise you when you realize that it is listed as the official Google Analytics partner.
It will allow you to add the tracking ID code we talked about, and it will also install a dashboard module so that you can track stats directly from the site.
GADWP goes even further than simply connecting the service. Due to its advanced features, you can analyze the site through other high-level data collections. That means that you get to see events and segments directly from the dashboard.
Now let’s see how to install the plugin and make the connection to the service:
- Go to Plugins -> Add New
- Search for “Google Analytics Dashboard for WP”
- Install and activate the plugin
- On the left side, find the Google Analytics menu item and open General Settings
- Click on the “Authorize plugin” button
- Click on the “Get Access Code” link
- In a new window, select your Google Analytics account and allow access to the plugin
- Copy the generated code
- Go back to the plugin and paste the access code
If the Google Analytics account is set up correctly, you should see the list of available reports from that account (if you have a new account, you’ll obviously have just one item on the list). After that, you can start using the plugin, change settings and monitor changes to the statistics.

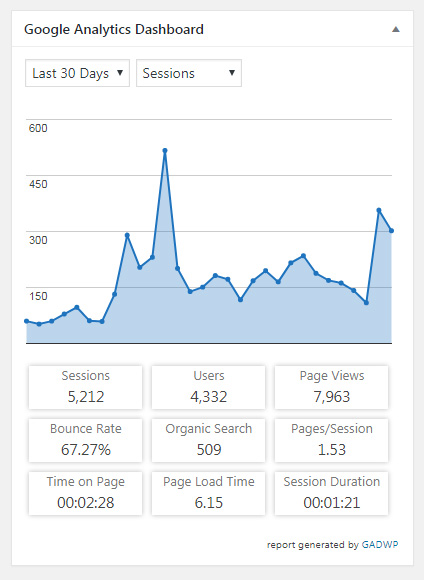
To see the first visual report, just navigate to your WordPress Dashboard where you will be able to see a graph with statistics of the last thirty days. Impressive, isn’t it?
NK Google Analytics
PRICE: Free
One of such plugins is the free NK Google Analytics. Since we have already created a step-by-step instructional video, please take a look above and learn how to install the plugin and connect it to your personal Google Analytics account.
Other Plugins
In this article, we have mentioned only two WordPress plugins. Just to give you more options, you can also take a look at other popular solutions like:
2. Manually add the code
If all you want is to connect the service to your site, the manual way will be more than enough. Although you won’t have to install additional plugins, you also won’t be able to track statistics directly from the site. Instead, you will always have to navigate away to Google Analytics pages to start analyzing.
We suggest using this method only if you know how to handle the code and WordPress templates. Since you will have to update the files, you are risking making mistakes and breaking your site. Also, if you’re not working with a child theme, you can lose the code as soon as your update your active WordPress theme.
Method #1
Google Analytics code needs to be placed in the header.php file which is loaded on every page of your site. So it makes sense to edit the file and paste the code on the right spot:
- Go to Google Analytics
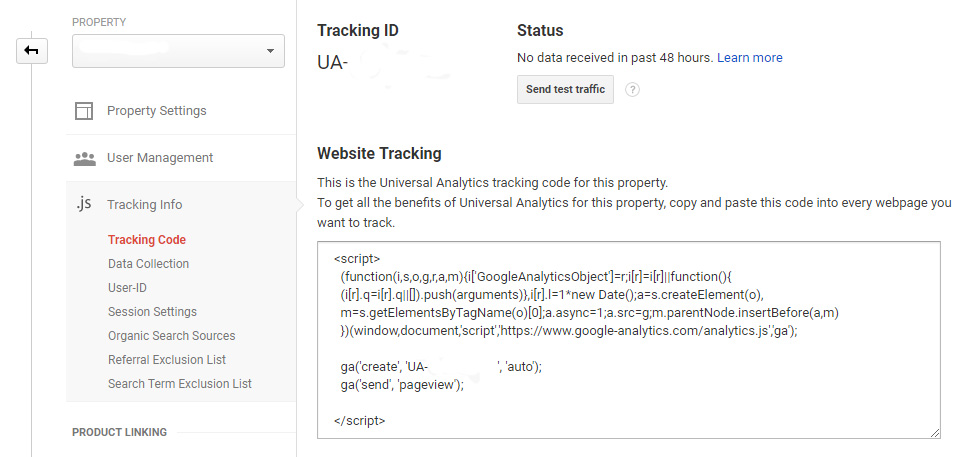
- Click on Admin -> Tracking Info -> Tracking Code
- Copy the entire code starting and ending with <script></script> tag
- Go to Appearance -> Editor
- Find header.php file and edit it
- Paste the tracking code right after the <body> tag
- Save changes

Method #2
The other method allows you to add the same code to the header of your website via the functions.php file:
- Go to Appearance -> Editor
- Edit functions.php file
- Copy and paste the following code:
<?php
add_action('wp_head', 'wp_googleanalytics');
function wp_googleanalytics() { ?>
// Paste your Google Analytics tracking code here (the one that starts and ends with the <script> tag)
<?php } ?>
Final Thoughts
You can run a blog or any site without a Google Analytics account. But if you choose to ignore the popular analytics tool, it’s like you are admitting that you don’t care about the project. Without knowing statistics about the site, you can just take guesses which probably won’t be even close to what’s actually happening on your site.
So, if you are serious about your blog, go ahead and install Google Analytics. Whether you just copy the code so that you track the data on the official Google Analytics page or go for one of the mentioned plugins, you can’t make a mistake.
If you installed tracking ID on your site, how surprised were you about the data? Have you expected any of that? Let us know your Google Analytics experiences with WordPress sites.


