Installing a plugin on a WordPress site is an easy task for many WordPress users. However, if you’re a beginner, you might be looking for simple ways to install a plugin. Plugins help bloggers and developers fine-tune their WordPress sites, and add additional features to a WordPress site, including payment methods, a shopping cart, forms, online courses, and much more.
As a WordPress user, you can’t overlook the importance of plugins because they extend the functionality of your site, from security to website speed improvement. They also help to add new features, eliminating the need for writing code.
Before diving into a detailed step-by-step process of plugin installation, let’s learn more about plugins first.
What are WordPress plugins?
A WordPress plugin is a piece of software, mostly written in PHP language, that is intended to enhance or add functionality to a WordPress website. New features can be quickly added to a WordPress site/blog through a plugin.
WordPress is one of the best and most famous CMSs out there (Content Management System). The key reason for this is the use of plugins that help users configure sites according to their needs. Plugins add a new look and functionality to your site by adding exciting features that aren’t available in the core WordPress installation.
Choosing the right plugin for your website is critical, as some plugins may cause trouble for your site.
Remember, WordPress users can only install their desired plugins on a self-hosted (WordPress.org) WordPress website. A website hosted on WordPress.com has some limitations with plugins.
The next section explains the difference between free and paid plugins.
Free vs. premium plugins
Free plugins
The WordPress repository contains free plugins that can fulfill most of their users’ requirements. The WordPress directory alone hosts more than 50 thousand plugins that can help users create galleries, optimize WordPress pages, create forms, and much more.
WordPress community members create these plugins. They are available for users at no cost whenever they install WordPress on a site. After critical review, these plugins are listed on the WordPress repository.
You can install a plugin whenever you need one. Users install them for various reasons as each Plugin serves a particular unique need. Some examples of free plugins are Akismet, Contact Form 7, and WP Super Cache.
Along with WordPress, many other developers and designers out there offer free plugins as part of their website development services.
Let’s talk about paid plugins next.
Premium plugin
A WordPress user can purchase premium plugins from third-party WordPress designers and developers, paying anywhere from a few dollars to several hundred dollars. The set price depends on the additional features that come with it, including regular updates and customer support.
You could be wondering about whether to use free plugins or premium plugins on your WordPress website. Don’t worry, this next section will help you to make a decision.
Which plugin (s) should a WordPress user consider? – Free Vs. Premium
The free plugins included in the WordPress.org repository have to fulfill specific criteria before they become available for users. However, even if the plugins pass those criteria, it is not guaranteed that their code is well written and optimized. Poorly written code can affect your website’s performance and can introduce security loopholes.
Many free plugins even lack the documentation required to operate the plugin, making it difficult to use. However, not all free plugins are low in quality. There are many free (WordPress Directory/Third Party) plugins that can help you to perform various takes on your website elegantly, and free of cost.
Sometimes premium plugin developers also provide a basic version of their plugin for free. However, you would have to buy the premium plugin for advanced functionalities.
If a free plugin fulfills your requirements, then there is no need to buy a premium plugin. However, if the free plugin doesn’t meet your needs, then go for the paid plugin.
Before installing a plugin, take careful notes to make sure that it is compatible with the WordPress version that you’re using. Also, watch for any issues reported by existing users by looking into ratings and reviews, especially when considering third party free plugins. Make sure that they are safe to use and that you’re getting them from a reliable source.
Now let’s see how many plugins a WordPress site must have.
How many WordPress plugins should you install?
There’s a plugin for every functionality. So, how many plugins should a WordPress user install on a site?
The answer may be quite surprising for you.
The fact is, the lesser the number of plugins on a site, the better is the site’s loading speed and performance. Excessive use of plugins may slow down website performance.
Read on to find out why.
Using a WordPress plugin is not always the right decision, especially if you only need to add minor functionality to your website because plugins work as a code. If you know how to write code, you can still add the required features to perform a specific task without installing a plugin, by manually adding codes into the core WordPress files.
Adding plugins means increasing the number of codes on your site. So, if the coding goes wrong, or the plugin is outdated and not compatible with your site version, it will affect your site loading speed. Also, it may take more time to complete the desired action.
Most of the plugins in the WordPress directory are well coded. If you are using WordPress plugins from the WordPress repository, then chances are good that it will not slow down your site performance. However, keep in mind that plugins are not recommended unless they are necessary.
How to install a plugin on a WordPress site – Step by step
If you’re new to WordPress, you might find plugin installation a challenging task. However, this section will guide you through the complete step-by-step process.
In this guide, you’ll learn how to install free and premium plugins. We will be discussing three methods of installing WordPress plugins on your site. This includes free plugin installation, premium plugin installation, and installing WordPress plugins manually using FTP.
Methods to Install WordPress plugins
- Free plugin Installation using the WordPress Admin Area
- Plugin Installation using the Plugin Upload Option.
- Manual WordPress plugins installation using FTP.
Let’s take a look at all three methods for how to install WordPress plugins.
1. Install a free plugin using the WordPress admin area and using the “Plugin Search” option.
This first method is installing a free plugin via the WordPress Admin Area / Dashboard from the WordPress plugins repository. This directory is instantly accessible when users install WordPress. They can immediately search its contents directly from their admin dashboard.
The only constraint is that the plugin must be available in the WordPress plugin directory, which only has free plugins.
Follow this whole process to learn how to install a Free Plugin using a built-in plugin search.
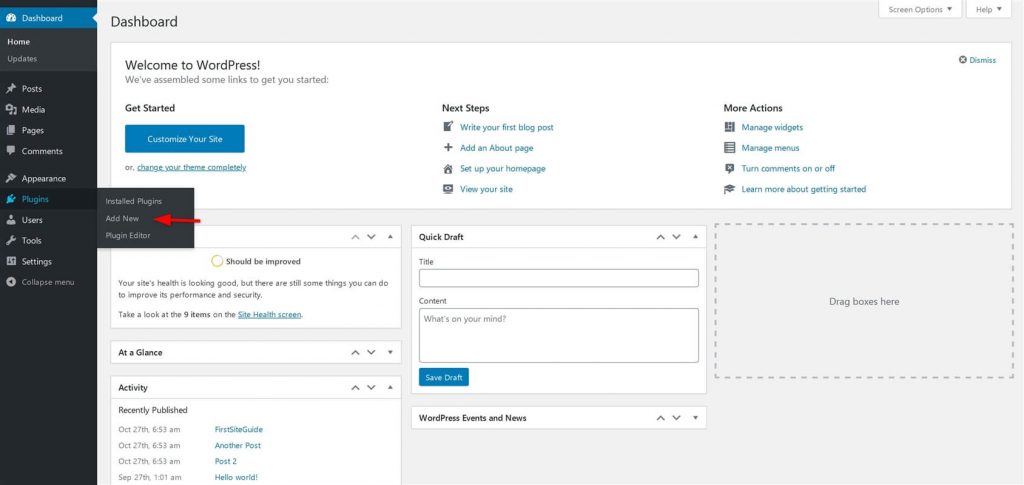
- Hover your cursor over “Plugins” within your WordPress Admin Area. Now, click on “Add New”.
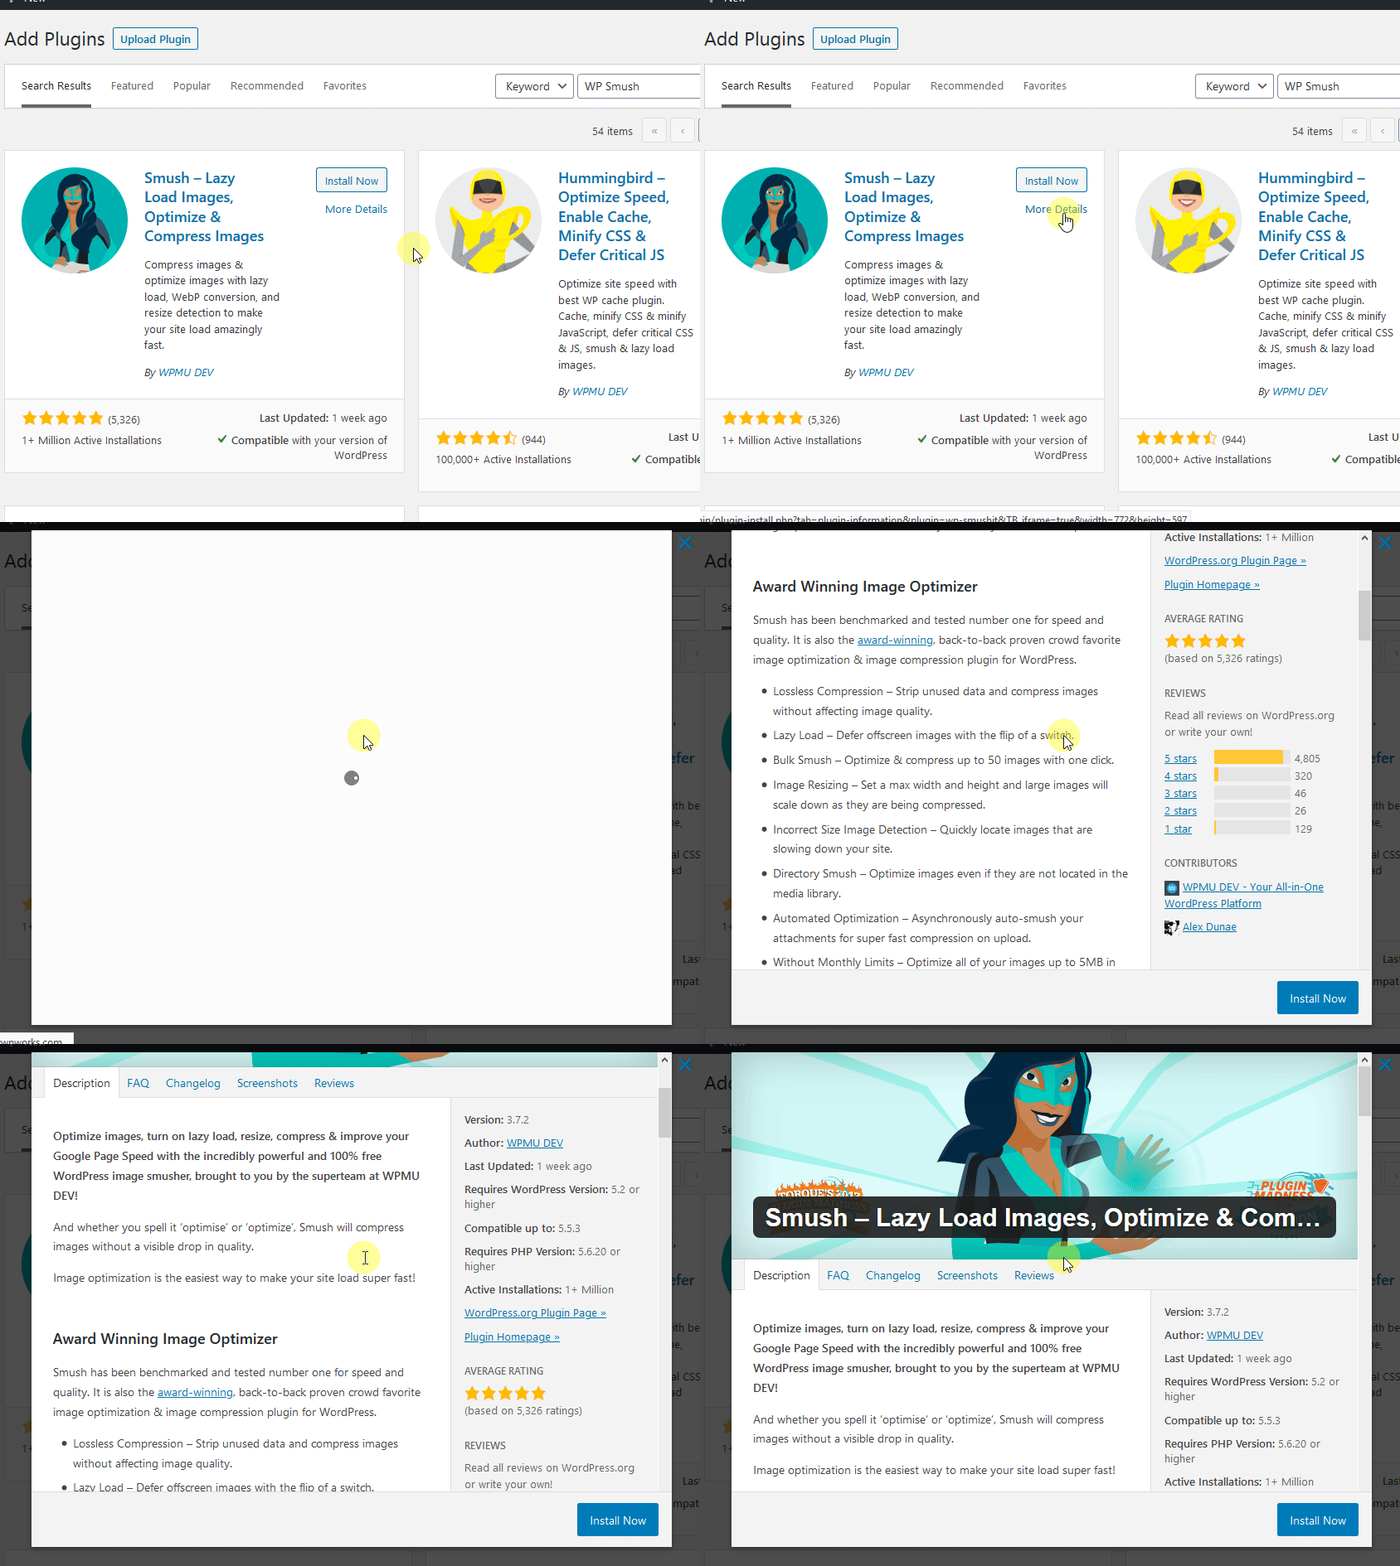
- Search the plugin by entering the plugin name, author name, or the functionality that you are looking for in the plugins search bar located in the top right.
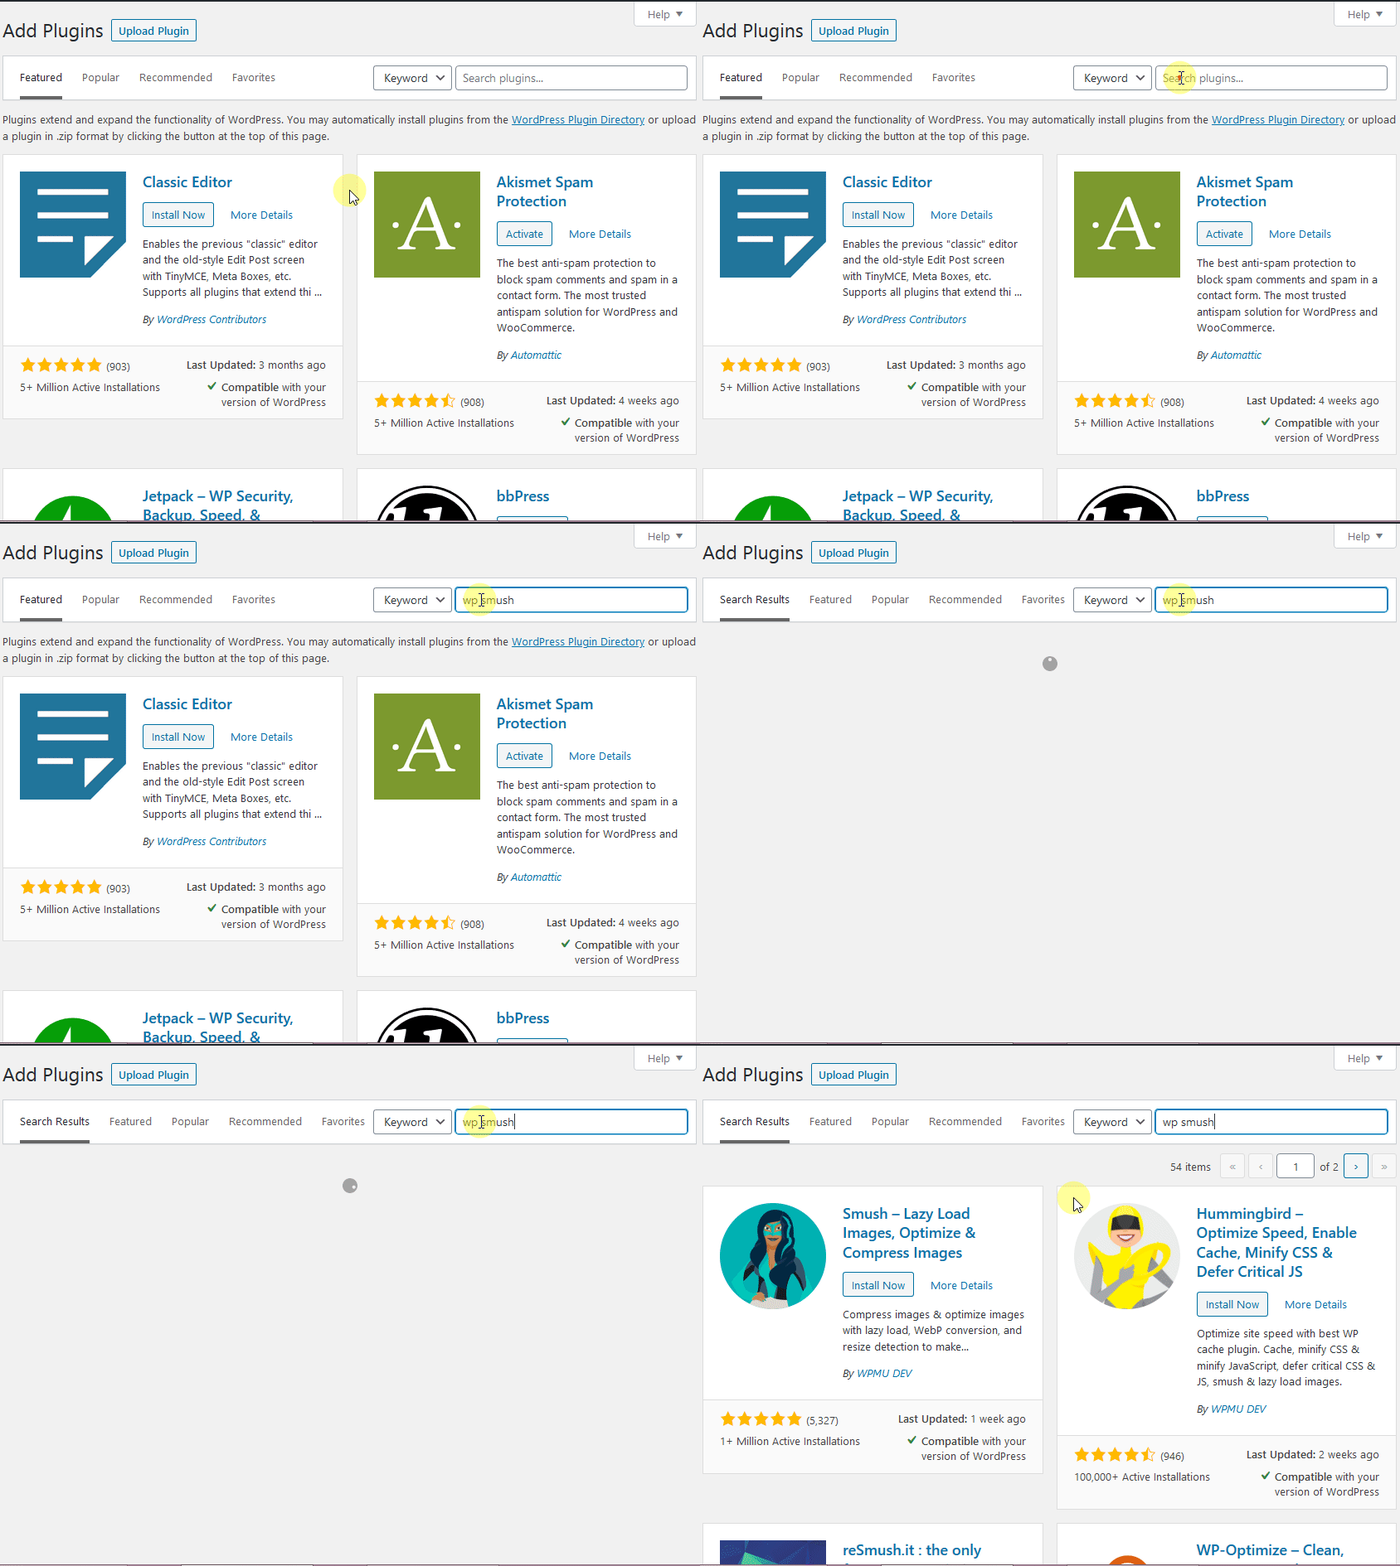
- From the various browsing results that appear, click on a plugin to read more about its installation notes and documentation. For instance, if you’re looking for an image optimization plugin, the popular WordPress plugin for compressing images is WP Smush.
- Click on the “Install Now” button for plugin installation. Once the installation is done, the “Install Now” button will convert to the “Activate” button. To activate the WordPress plugin, click on the “Activate” button.
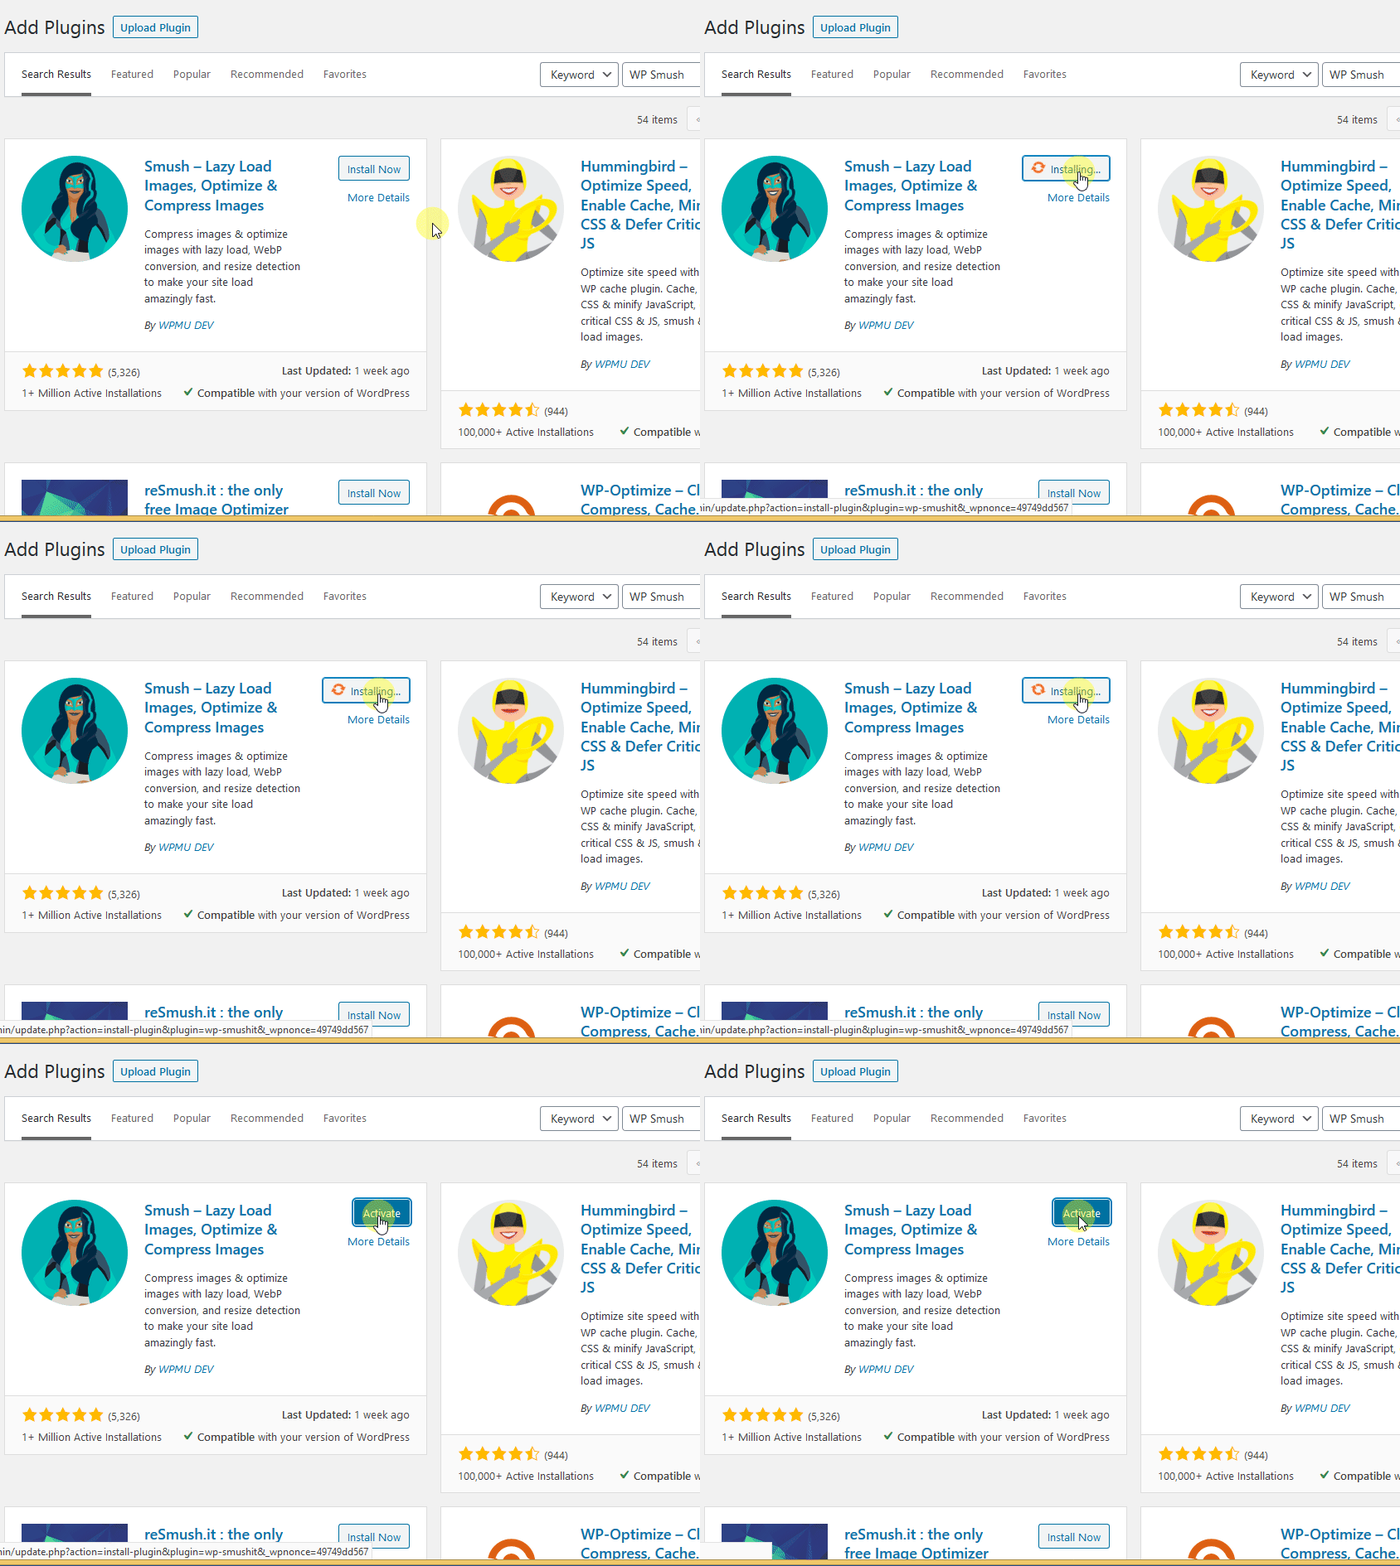
Once you click on the “Activate” button, your plugin will be readily available for use.
Now, you’ve learned the whole process of free WordPress plugin installation. Isn’t it as simple as search & install?
How can a WordPress user configure the plugin’s settings? This process differs from one plugin to another. This guide is about free and premium plugin installation, so we’re not going to cover plugin configuration settings.
2. Install a plugin using the “Plugin Upload” option
Do you know how to install a plugin on a WordPress site that is not available in your WordPress directory? A WordPress user has to buy these other plugins from a third-party developer and then download them from the source as a zip file. Users can then upload the zip file and install it using the WordPress Admin Area “Plugin Upload” option by following these steps.
- Go to the “Plugins” section within your Dashboard area. Now, click on “Add New”.

- Click on “Upload Plugin” located on the top of the screen. Select the plugin’s zip file from your system. WordPress will upload the file from your computer to the server. After the file is selected click on the “Install Now” button.
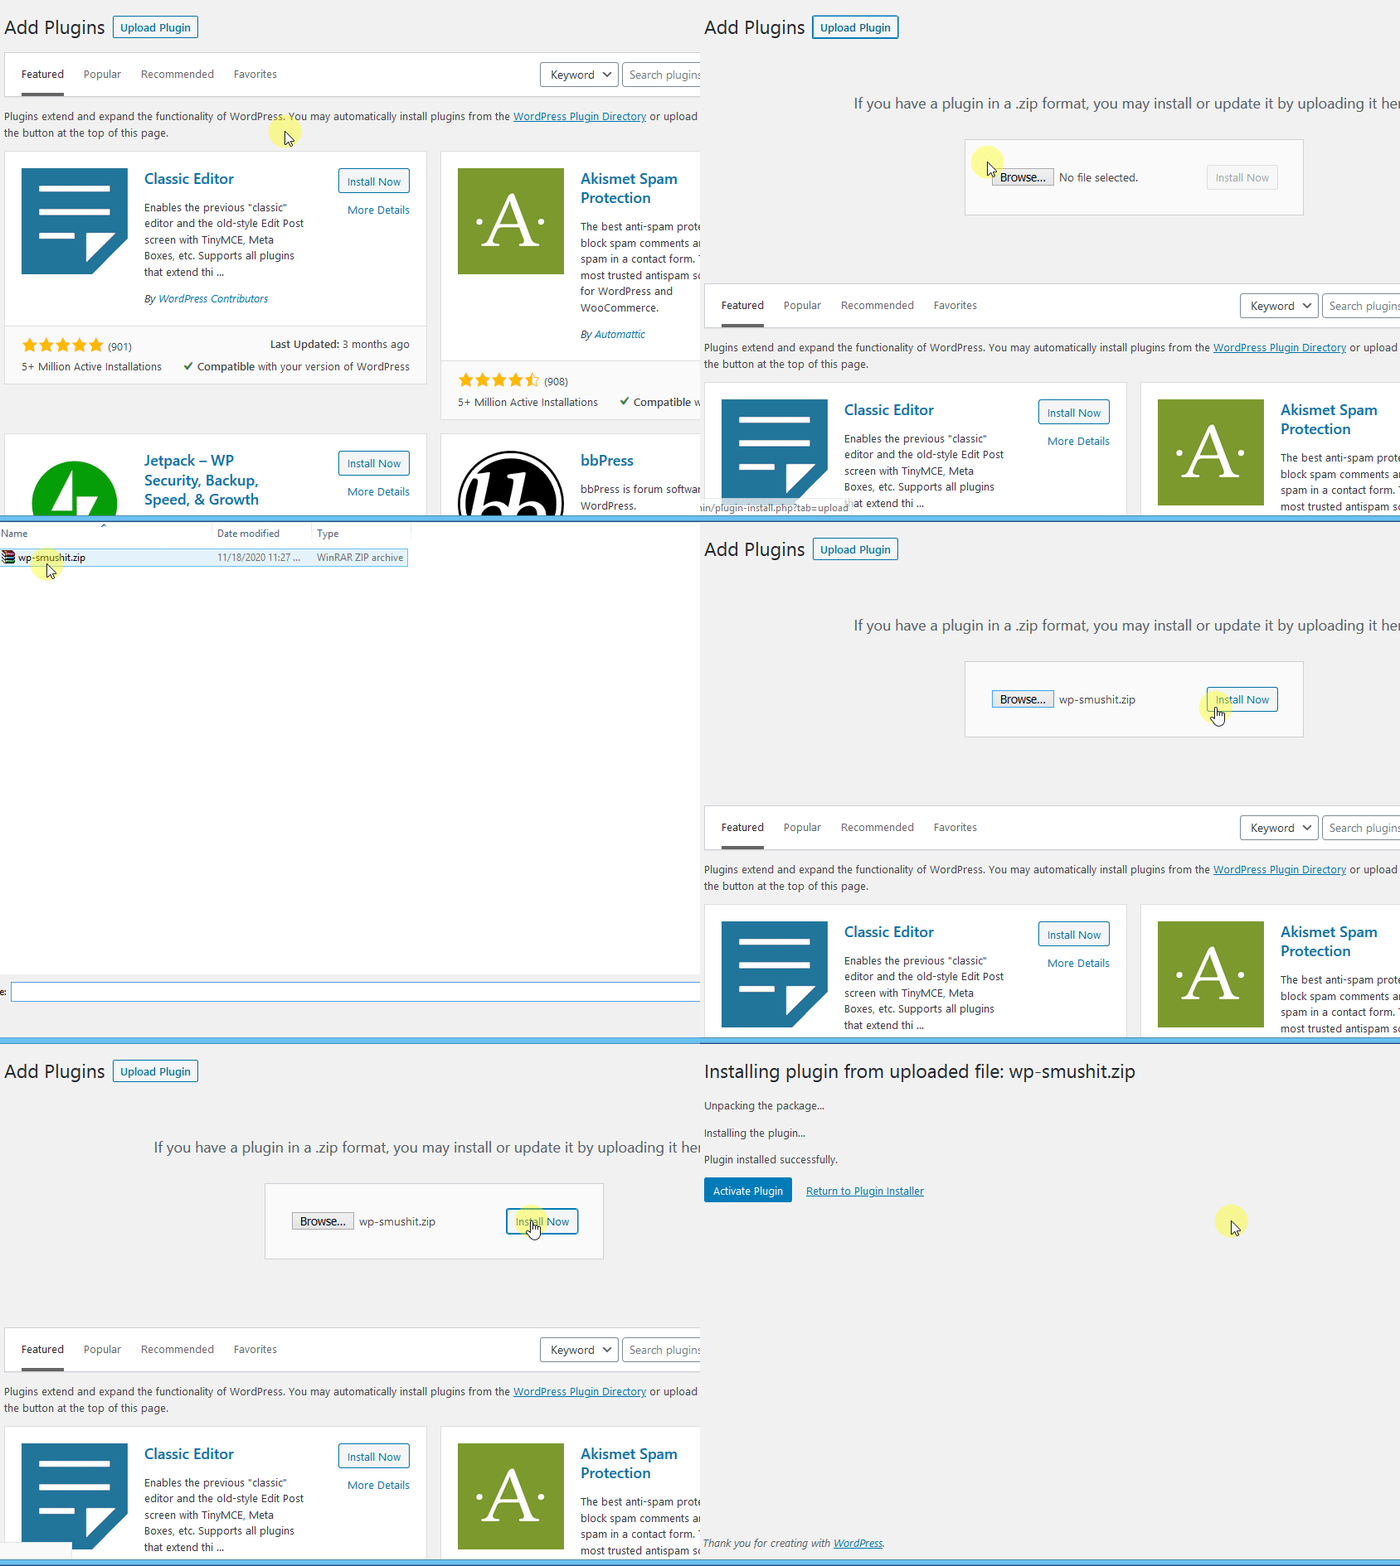
- After a successful installation, a notification will appear stating: “Plugin installed successfully.”

- Click on the “Activate Plugin” button to activate the plugin successfully. Your plugin is ready to use.

Note: Free plugins can also be installed in the same way if you have the plugin files in a zip format.
3. Install WordPress plugins manually using FTP
Installation of free and premium plugins is comparatively easy from the WordPress dashboard. However, the third method requires the user to have some technical knowledge to install the plugin manually using FTP software like FileZilla.
Before installing the plugin through this method, a WordPress user must be familiar with file transfer using FTP. This technique becomes handy when you need to install a plugin from outside of the WordPress admin area (Dashboard).
However, if you’re a beginner, remember to create a backup before installing the plugin. Some plugins are not compatible with WordPress versions or are insecure, and installing those plugins could damage your site.
Follow these steps to install WordPress plugins manually using FTP software:
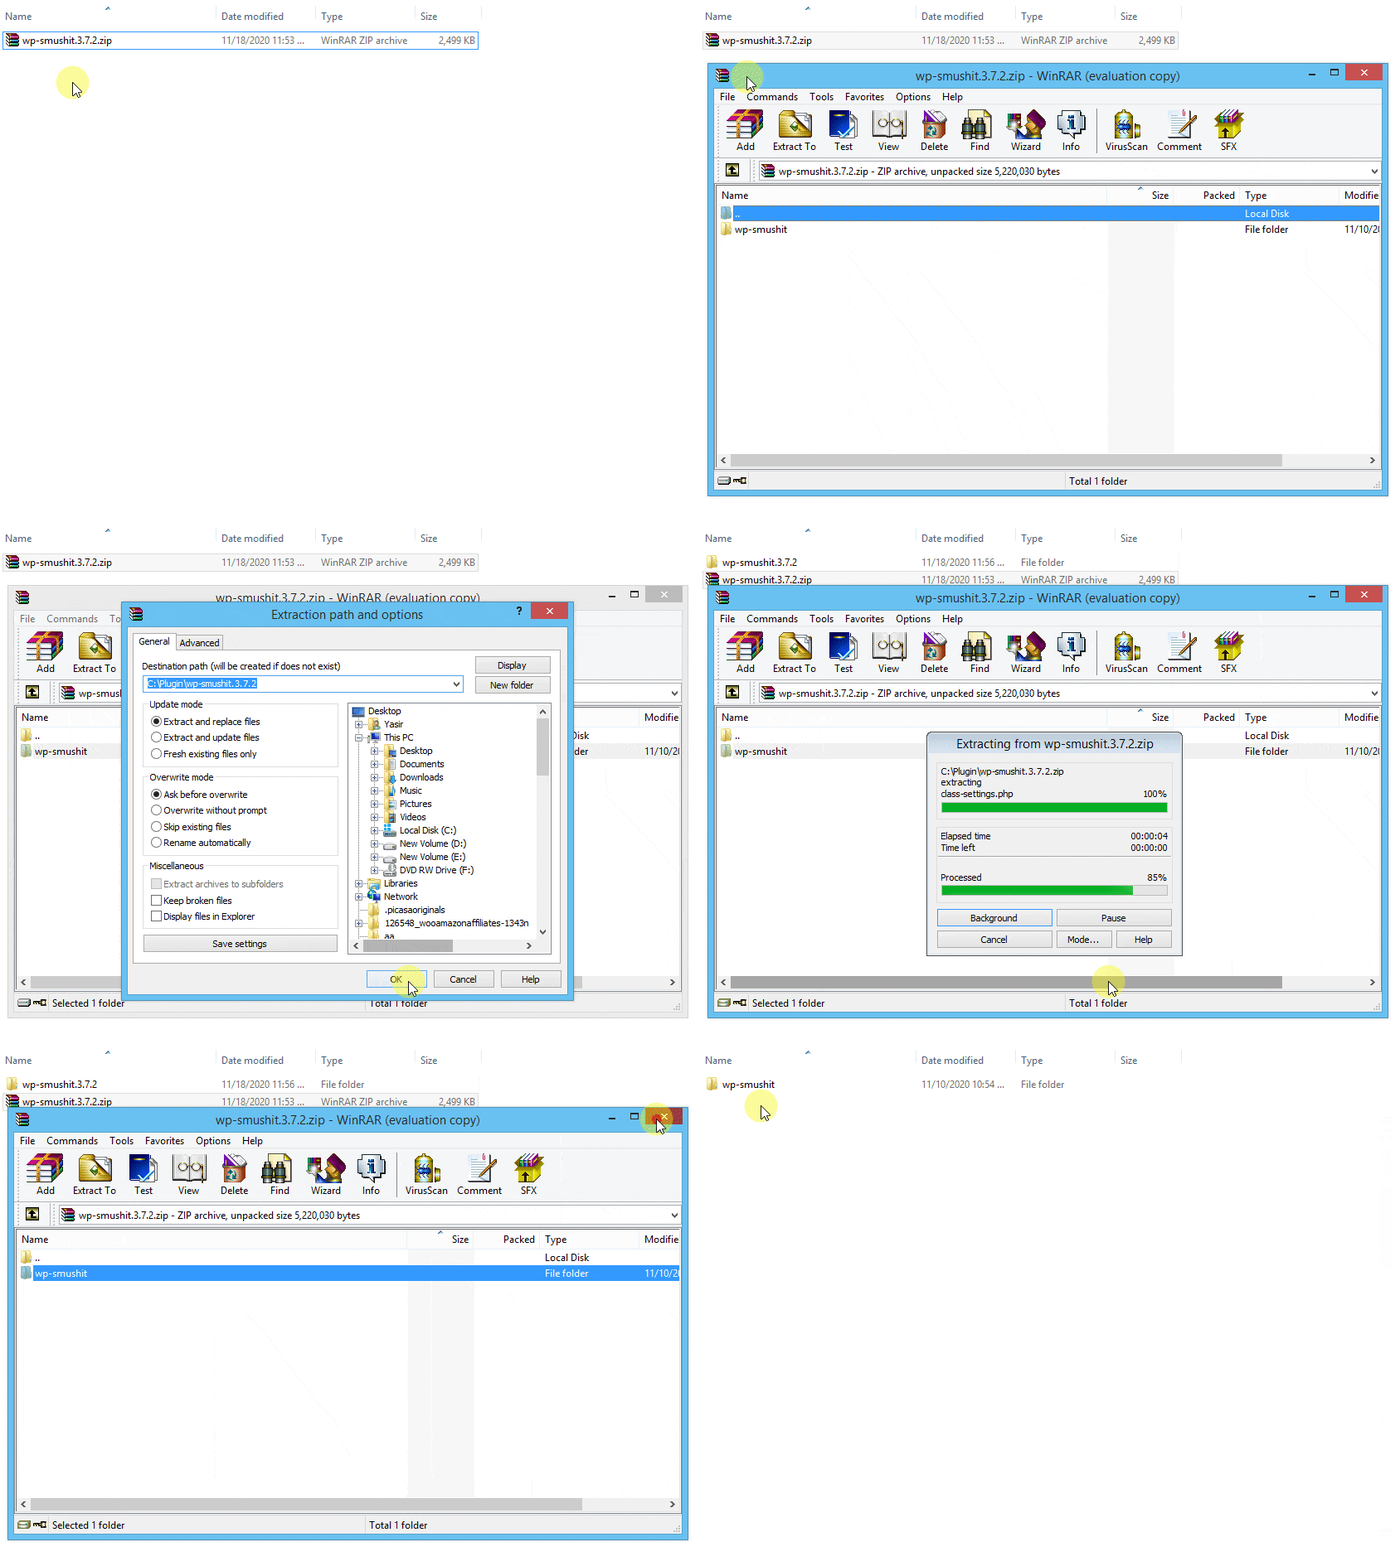
- First, download the plugin’s zip file. You can also get a zip file of free plugins from the WordPress.org official repository. Once you get the zip file, unzip it on your system. The extracted folder will be the folder that you will need to upload manually to your WordPress dashboard using an FTP client.
- You can access your server through the FTP manager. Contact your hosting provider for FTP login details. Open the FTP on your computer and connect to your website using the login details (username & password) provided by your hosting provider. Once connected, go to the “/wp-content/plugins/” folder on your site.
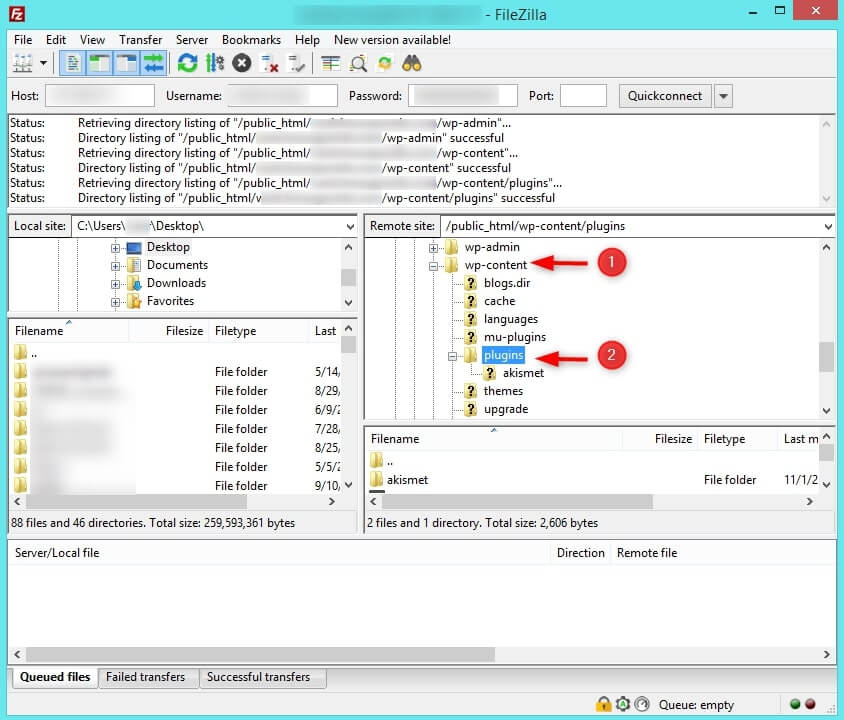
- Now upload the extracted folder of the plugin to the “/wp-content/plugins/” folder of your server. After the plugin’s folder is uploaded to the server, the plugin will be installed successfully on your WordPress site. Go to “Plugins” within your WordPress Admin Area (Dashboard) and locate the installed plugin on the list.

- Click on the “Activate” button below the plugin. Your plugin is ready to use. Configure the settings as per your specific needs.

This is how a WordPress user can install a plugin manually using FTP.
Conclusion
In this guide, we have described three methods of installing WordPress plugins in detail. It is similar to the installation of themes in WordPress, by using three different methods. No doubt, plugins improve the functionality of a WordPress website. You can add unlimited features to your website with just a few clicks. How could a site owner resist using plugins to enhance their site’s functionality once they know how to install them. Go ahead and make your WordPress website awesome.

